Installing Whoogle on a Raspberry Pi Zero 2 W in 2025

Whoogle is a project created by Ben Busby. Here is his short explanation of what it does:
Get Google search results, but without any ads, JavaScript, AMP links, cookies, or IP address tracking. Easily deployable in one click as a Docker app, and customizable with a single config file. Quick and simple to implement as a primary search engine replacement on both desktop and mobile.
At the start of 2024 I wrote an article explaining what Whoogle is and how I installed it on a Raspberry Pi Zero 2 W, so my children and I could use it for private online searches at home. A Raspberry Pi Zero 2 W is a very light and cheap little computer that you can run a home server on.
I recently learned that the method I used in 2024 no longer works. This post is an update that explains how to install Whoogle on your Raspberry Pi Zero 2 W in 2025.
Flashing the operating system onto a micro SD card
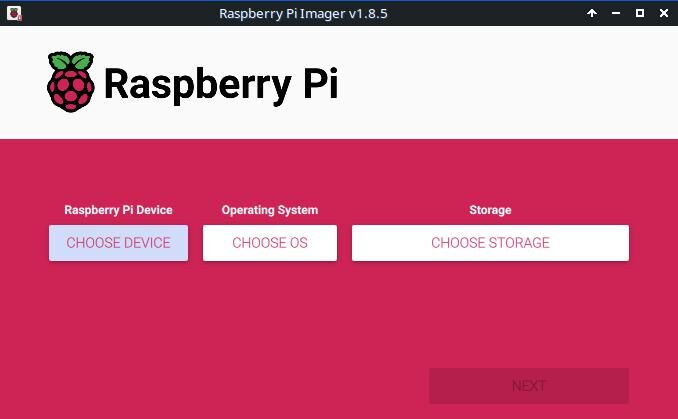
The simplest way flash an operating system onto your Raspberry Pi is to download their Imager software. Once you have that, you can connect the Pi's micro SD card to your computer (I used an adapter card to regular SD size) and flash the OS.
I wanted to install a desktop-less OS that I can use SSH into from my own computer.
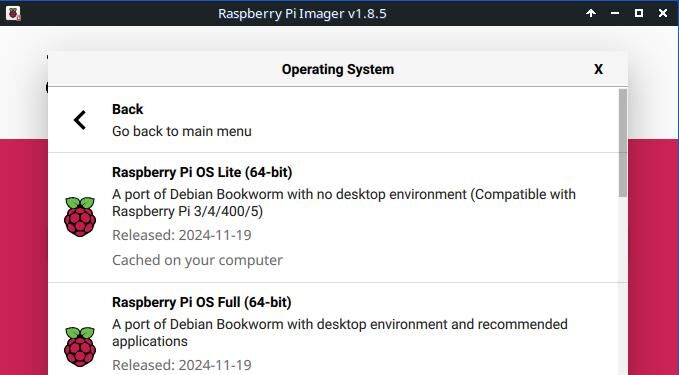
In our specific case, scroll down to the Rapsberry Pi OS (other) and select Raspberry Pi OS Lite (64 bit). Important here is that the 32 bit OS didn't work with Whoogle when I tested it.
Once you've selected the type of Raspberry Pi Device and where the SD storage can be found, you'll get an option to edit the installation. I did that and changed the following settings:
- added a username and password
- entered my home's WiFi address and its password
- enabled SSH
- enabled hostname: 'raspberrypi.local'
The last step saves you from having to figure out what IP address is assigned to your Pi once it connects to the network.
Once the OS is installed, you can remove the SD card, insert it into your Pi device, and connect it to power. I have mine close to the home's router so it can receive a strong WiFi signal.
SSH and updating the system
Next, I used the ssh command to access the newly set-up Pi remotely. First, wait 3 - 4 minutes for the OS to boot up fully. Then type:
ssh <username>@raspberry.local
in a command terminal on your regular computer, and use the password you created earlier to log in. You may have to install the SSH program on your PC first, and you will be asked if you're sure you want to connect remotely to the new device.
Next, update with:
sudo apt update && sudo apt upgrade
and if you want to know the IP address of your Pi, use the command ifconfig.
Installing docker
Ben Busby's GitHub page shows a variety of ways to install Whoogle, and I went with the docker method.
curl -sSL https://get.docker.com | sh (This runs a script that installs docker)
sudo usermod -aG docker $USER (change privileges so your user can run docker commands)
docker --version will show you the version of docker that's installed
logout and then log in again
Installing Whoogle
I got stuck on this step for a couple of days and got through it with the help of a generous Reddit user on r/RASPBERRY_PI_PROJECTS. Thanks again to that person!
To make a long story short, I had to build the Whoogle image myself, because the existing docker images don't work on the Raspberry Pi's ARM CPU. This sounds like hacker-level stuff, but it pretty much ran itself. It just takes a bit more time.
Remember to always check the Whoogle GitHub page for the most up-to-date information!
To do build the Whoogle image, run the following commands in this order:
git clone https://github.com/benbusby/whoogle-search.git
cd whoogle-search
docker build --tag whoogle-search:1.0 . The full stop must be included!
This process takes a while. Once it is completed, you can start up Whoogle on your home network with;
docker run --publish 5000:5000 --detach --name whoogle-search whoogle-search:1.0
It is important to remember that the name of your image is 'whoogle-search:1.0' and not 'whoogle-search' as it will be referred to in all the documentation.
Checking Whoogle in browser
The final step, is to go to your browser and type the following URL in the address bar:
http:raspberrypi.local:5000
Your browser may warn you that it is not safe to proceed to http, but you can ignore this as you are connecting to Whoogle on your local network and not on the public Internet.

You can then edit your configurations as I explain in the first article here.
Problems
- Installing the Whoogle docker image on GitHub resulted in the error no matching manifest for linux/arm/v7 in the manifest list entries. The solution is to build the image from scratch as described above—see Whoogle's GitHub page
- If you decide to wipe the OS and start all over, as I did a few times, you'll need to remove the existing SSH key that's on your computer. When you first try to use SSH to access the Pi again after a fresh install, there will be an explanation in the terminal you're using how to do this.
- I've had problems with YouTube comments not appearing when I search with Whoogle
- There is a big warning on the main Whoogle GitHub page about JavaScript that has not been amended since it was posted in January this year
- Rereading over the section My Docker Notes in the 2024 post, I now realise I'll have to build the image from scratch every time there are updates!
- The GitHub page explains how to set Whoogle as your primary search engine in different browsers, but I'm getting mixed results/empty-looking home pages with this at the moment.
Conclusions
As mentioned in my 2024 article, searches are a bit slower, but all in all, Whoogle is a nice home project to run on your Raspberry Pi on the local network. It's always best to visit Whoogle's GitHub page for the most up-to-date information and installation instructions.
Updates
12 May 2025 I received the following information about the Whoogle docker build from another Redditor on r/RASPBERRY_PI_PROJECTS that I'd like to share:
By the way, there's an error in the source file. The author has fixed several similar ones, but this remains:
./app/utils/search.py: if match := re.search("(\^|\s)!($|\s)", q):
There needs to be the letter 'r' between the first paren and the quote:
if match := re.search(r"(\^|\s)!($|\s)", q):
After doing git clone, manually fix this with an editor and then run the docker build command. Otherwise if you look at 'docker logs whoogle-search', you'll see 'Syntax error' messages saying the \s are invalid.
Documentation
Whoogle section on docker installations
Discussion on r/RASPBERRY_PI_PROJECTS
Some useful docker commands in the above article
how to set Whoogle as your primary search engine
-----Discuss on Mastodon-----
Subscribe to my blog via email or RSS feed.
Find me on Mastodon.
Back to Blog